It is often convenient for developers to work in an environment where changes to client or application software can be deployed and tested rapidly and without putting real-world users or assets at risk. For this purpose, the Parallax client has a --dev flag that spins up the Parallax client in “developer mode”. This creates a single-node Parallax test network with no connections to any external peers. It exists solely on the local machine. Starting the Parallax client in developer mode does the following:
  • Initialises the data directory with a testing genesis block
  • Sets max peers to 0 (meaning the Parallax client does not search for peers)
  • Turns off discovery by other nodes (meaning the node is invisible to other nodes)
  • Sets the gas price to 0 (no cost to send transactions)
  • Uses the Clique proof-of-authority consensus engine which allows blocks to be mined as-needed without excessive CPU and memory consumption
  • Uses on-demand block generation, producing blocks when transactions are waiting to be mined
This configuration enables developers to experiment with the Parallax client’s source code or develop new applications without having to sync to a pre-existing public network. Blocks are only mined when there are pending transactions. Developers can break things on this network without affecting other users. This page will demonstrate how to spin up a local Parallax testnet and a simple smart contract will be deployed to it using the Remix online integrated development environment (IDE).

Prerequisites

It is assumed that the user has a working the Parallax client installation (see installation guide). It would also be helpful to have basic knowledge of the Parallax client and the Javascript console. See Getting Started. Some basic knowledge of Solidity and smart contract deployment would be useful.

Start the Parallax client in Dev Mode

Starting the Parallax client in developer mode is as simple as providing the --dev flag. It is also possible to create a realistic block creation frequency by setting --dev.period 5 instead of creating blocks only when transactions are pending. There are also additional configuration options required to follow this tutorial. Remix will be used to deploy a smart contract to the node which requires information to be exchanged externally to the Parallax client’s own domain. To permit this, enable http and the net namespace must be enabled and the Remix URL must be provided to --http.corsdomain. For this tutorial some other namespaces will also be enabled. The full command is as follows:
prlx --dev --http --http.api eth,web3,net --http.corsdomain "http://remix.ethereum.org"
The terminal will display the following logs, confirming the Parallax client has started successfully in developer mode:
INFO [07-27|17:33:30.439] Starting Parallax in ephemeral dev mode...
WARN [07-27|17:33:30.439] You are running Parallax in --dev mode. Please note the following:

  1. This mode is only intended for fast, iterative development without assumptions on
     security or persistence.
  2. The database is created in memory unless specified otherwise. Therefore, shutting down
     your computer or losing power will wipe your entire block data and chain state for
     your dev environment.
  3. A random, pre-allocated developer account will be available and unlocked as
     eth.coinbase, which can be used for testing. The random dev account is temporary,
     stored on a ramdisk, and will be lost if your machine is restarted.
  4. Mining is enabled by default. However, the client will only seal blocks if transactions
     are pending in the mempool. The miner's minimum accepted gas price is 1.
  5. Networking is disabled; there is no listen-address, the maximum number of peers is set
     to 0, and discovery is disabled.

INFO [07-27|17:33:30.439] Maximum peer count                       ETH=50 LES=0 total=50
INFO [07-27|17:33:30.439] Set global gas cap                       cap=50,000,000
INFO [07-27|17:33:30.553] Using developer account                  address=0xa7F18aD76a5F7e1F0d5BfB2E36CeDd7eC5324b29
INFO [07-27|17:33:30.553] Allocated trie memory caches             clean=154.00MiB dirty=256.00MiB
INFO [07-27|17:33:30.553] Writing custom genesis block
INFO [07-27|17:33:30.553] Persisted trie from memory database      nodes=12 size=1.82KiB time="15.958µs" gcnodes=0 gcsize=0.00B gctime=0s livenodes=1 livesize=0.00B
INFO [07-27|17:33:30.553] Initialised chain configuration          config="{ChainID: 1337 Homestead: 0 DAO: <nil> DAOSupport: false EIP150: 0 EIP155: 0 EIP158: 0 Byzantium: 0 Constantinople: 0 Petersburg: 0 Istanbul: 0, Muir Glacier: 0, Berlin: 0, London: 0, Arrow Glacier: <nil>, MergeFork: <nil>, Terminal TD: <nil>, Engine: clique}"
INFO [07-27|17:33:30.553] Initialising Parallax Protocol        name= versions=[] network=1337 dbversion=<nil>
INFO [07-27|17:33:30.553] Loaded most recent local header          number=0 hash=efac4a..3904e4 td=1 age=54y4mo5d
INFO [07-27|17:33:30.553] Loaded most recent local full block      number=0 hash=efac4a..3904e4 td=1 age=54y4mo5d
INFO [07-27|17:33:30.553] Loaded most recent local fast block      number=0 hash=efac4a..3904e4 td=1 age=54y4mo5d
WARN [07-27|17:33:30.554] Failed to load snapshot, regenerating    err="missing or corrupted snapshot"
INFO [07-27|17:33:30.554] Rebuilding state snapshot
INFO [07-27|17:33:30.554] Resuming state snapshot generation       root=2a9a45..bb4bda accounts=0 slots=0 storage=0.00B dangling=0 elapsed="132.083µs"
INFO [07-27|17:33:30.554] Gasprice oracle is ignoring threshold set threshold=2
WARN [07-27|17:33:30.554] Error reading unclean shutdown markers   error="not found"
ERROR[07-27|17:33:30.554] Failed to check db for legacy receipts   err="this operation is not supported"
INFO [07-27|17:33:30.554] Starting peer-to-peer node               instance=Prlx/v1.0.0-stable-95cf8a9f/darwin-arm64/go1.20.6
WARN [07-27|17:33:30.554] P2P server will be useless, neither dialing nor listening
INFO [07-27|17:33:30.554] Generated state snapshot                 accounts=10 slots=0 storage=412.00B dangling=0 elapsed="287.166µs"
INFO [07-27|17:33:30.554] Stored checkpoint snapshot to disk       number=0 hash=efac4a..3904e4
INFO [07-27|17:33:30.556] IPC endpoint opened                      url=/var/folders/j2/t2yw6xxs20sfnb1qlr4hc9br0000gn/T/prlx.ipc
INFO [07-27|17:33:30.556] New local node record                    seq=1,690,490,010,555 id=7d74b1101188406b ip=127.0.0.1 udp=0 tcp=0
INFO [07-27|17:33:30.556] Started P2P networking                   self=enode://7f6c9244dc6ffeb0824085cf67a75bc0a6fafc8fc5490690c474ea3fefb8c97478fedd9aeb7163e3dbed865d0586f7e811af596660c0d9be6a5cb6956993233e@127.0.0.1:0
INFO [07-27|17:33:30.556] HTTP server started                      endpoint=127.0.0.1:8545 auth=false prefix= cors=http://remix.ethereum.org vhosts=localhost
INFO [07-27|17:33:30.556] Transaction pool price threshold updated price=0
INFO [07-27|17:33:30.556] Updated mining threads                   threads=0
INFO [07-27|17:33:30.556] Transaction pool price threshold updated price=1
INFO [07-27|17:33:30.556] Etherbase automatically configured       address=0xa7F18aD76a5F7e1F0d5BfB2E36CeDd7eC5324b29
WARN [07-27|17:33:30.556] Failed to get free disk space            path= err="failed to call Statfs: no such file or directory"
INFO [07-27|17:33:30.556] Commit new sealing work                  number=1 sealhash=48e711..4b52d3 uncles=0 txs=0 gas=0 fees=0 elapsed="31.916µs"
WARN [07-27|17:33:30.556] Block sealing failed                     err="sealing paused while waiting for transactions"
INFO [07-27|17:33:30.556] Commit new sealing work                  number=1 sealhash=48e711..4b52d3 uncles=0 txs=0 gas=0 fees=0 elapsed="91.75µs"
This terminal must be left running throughout the entire tutorial. In a second terminal, attach a Javascript console. By default the ipc file is saved in the datadir:
prlx attach <datadir>/prlx.ipc
The Javascript terminal will open with the following welcome message:
Welcome to the Prlx JavaScript console!

instance: Prlx/v1.0.0-stable-95cf8a9f/darwin-arm64/go1.20.6
coinbase: 0xa7f18ad76a5f7e1f0d5bfb2e36cedd7ec5324b29
at block: 0 (Wed Dec 31 1969 21:00:00 GMT-0300 (-03))
 datadir:
 modules: admin:1.0 clique:1.0 debug:1.0 eth:1.0 miner:1.0 net:1.0 personal:1.0 rpc:1.0 txpool:1.0 web3:1.0

To exit, press ctrl-d or type exit
>
For simplicity this tutorial uses the Parallax client’s built-in account management. First, the existing accounts can be displayed using eth.accounts:
eth.accounts
An array containing a single address will be displayed in the terminal, despite no accounts having yet been explicitly created. This is the “coinbase” account. The coinbase address is the recipient of the total amount of Laxes created at the local network genesis. Querying the balance of the coinbase account will return a very large number. The coinbase account can be invoked as eth.accounts[0] or as eth.coinbase:
eth.coinbase==eth.accounts[0]
true
The following command can be used to query the balance. The return value is in units of Wei, which is divided by 1e18 to give units of Lax. This can be done explicitly or by calling the web3.FromWei() function:
eth.getBalance(eth.coinbase)/1e18

// or

web3.fromWei(eth.getBalance(eth.coinbase))
Using web3.fromWei() is less error prone because the correct multiplier is built in. These commands both return the following:
1.157920892373162e+59
A new account can be created using Clef. Some of the Laxes from the coinbase can then be transferred across to it. A new account is generated using the newaccount function on the command line:
clef newaccount --keystore <path-to-keystore>
The terminal will display a request for a password, twice. Once provided, a new account will be created and its address printed to the terminal. The account creation is also logged in the Parallax client’s terminal, including the location of the keyfile in the keystore. It is a good idea to back up the password somewhere at this point. If this were an account on a live network, intended to own assets of real-world value, it would be critical to back up the account password and the keystore in a secure manner. To reconfirm the account creation, running eth.accounts in the Javascript console should display an array containing two account addresses, one being the coinbase and the other being the newly generated address. The following command transfers 50 Laxes from the coinbase to the new account:
eth.sendTransaction({from: eth.coinbase, to: eth.accounts[1], value: web3.toWei(50, "ether")})
A transaction hash will be returned to the console. This transaction hash will also be displayed in the logs in the Parallax client console, followed by logs confirming that a new block was mined (remember in the local development network blocks are mined when transactions are pending). The transaction details can be displayed in the Javascript console by passing the transaction hash to eth.getTransaction():
eth.getTransaction("0x62044d2cab405388891ee6d53747817f34c0f00341cde548c0ce9834e9718f27")
The transaction details are displayed as follows:
{
  accessList: [],
  blockHash: "0xdef68762539ebfb247e31d749acc26ab5df3163aabf9d450b6001c200d17da8a",
  blockNumber: 1,
  chainId: "0x539",
  from: "0x540dbaeb2390f2eb005f7a6dbf3436a0959197a9",
  gas: 21000,
  gasPrice: 875000001,
  hash: "0x2326887390dc04483d435a6303dc05bd2648086eab15f24d7dcdf8c26e8af4b8",
  input: "0x",
  maxFeePerGas: 2000000001,
  maxPriorityFeePerGas: 1,
  nonce: 0,
  r: "0x3f7b54f095b837ec13480eab5ac7de082465fc79f43b813cca051394dd028d5d",
  s: "0x167ef271ae8175239dccdd970db85e06a044d5039252d6232d0954d803bb4e3e",
  to: "0x43e3a14fb8c68caa7eea95a02693759de4513950",
  transactionIndex: 0,
  type: "0x2",
  v: "0x0",
  value: 50000000000000000000
}
Now that the user account is funded with some Laxes, a contract can be created ready to deploy to the Parallax client.

A simple smart contract

This tutorial will make use of a classic example smart contract, Storage.sol. This contract exposes two public functions, one to add a value to the contract storage and one to view the stored value. The contract, written in Solidity, is provided below:
pragma solidity >=0.7.0;

contract Storage{


    uint256 number;

    function store(uint256 num) public{

        number = num;
    }

    function retrieve() public view returns (uint256){
        return number;

    }
}
Solidity is a high-level language that makes code executable by the Parallax Virtual Machine (PVM) readable to humans. This means that there is an intermediate step between writing code in Solidity and deploying it to Parallax. This step is called “compilation” and it converts human-readable code into PVM-executable byte-code. This byte-code is then included in a transaction sent from the Parallax client during contract deployment. This can all be done directly from the Parallax client Javascript console; however this tutorial uses an online IDE called Remix to handle the compilation and deployment of the contract to the local Parallax client.

Compile and deploy using Remix

In a web browser, open https://remix.ethereum.org. This opens an online smart contract development environment. On the left-hand side of the screen there is a side-bar menu that toggles between several toolboxes that are displayed in a vertical panel. On the right hand side of the screen there is an editor and a terminal. This layout is similar to the default layout of many other IDEs such as VSCode. The contract defined in the previous section, Storage.sol is already available in the Contracts directory in Remix. It can be opened and reviewed in the editor. 
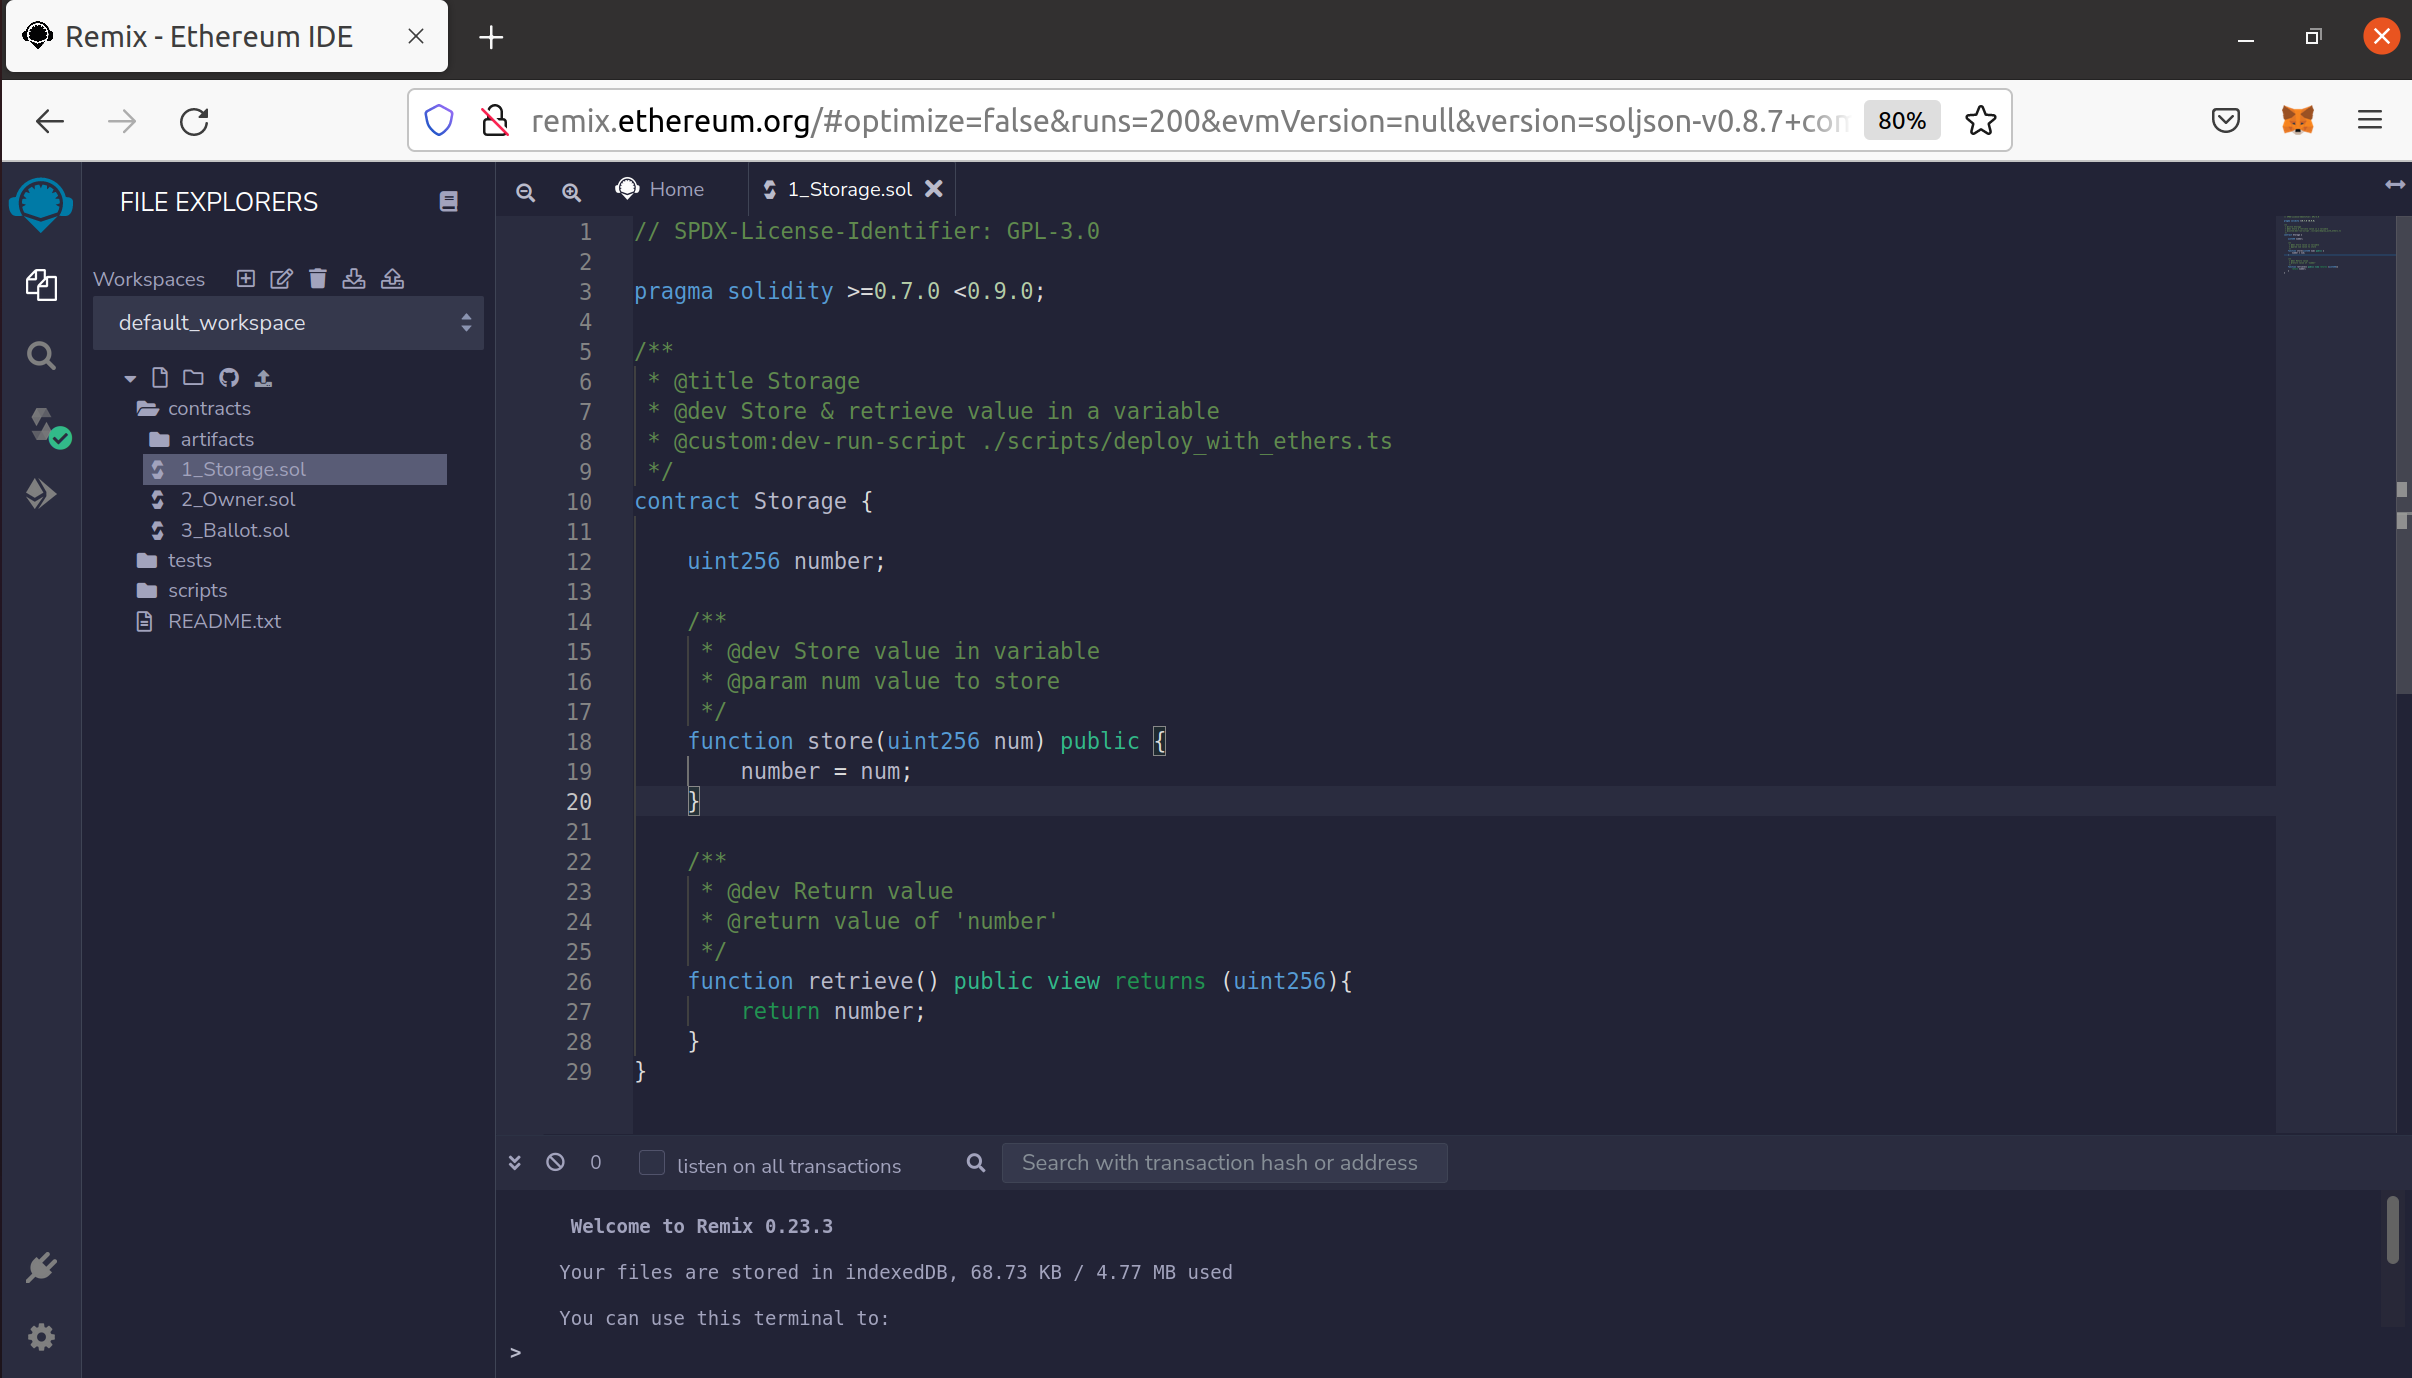
The Solidity logo is present as an icon in the Remix side-bar. Clicking this icon opens the Solidity compiler wizard. This can be used to compile Storage.sol ready. With Solidity.sol open in the editor window, simply click the Compile 1_Storage.sol button. A green tick will appear next to the Solidity icon to confirm that the contract has compiled successfully. This means the contract bytecode is available. 
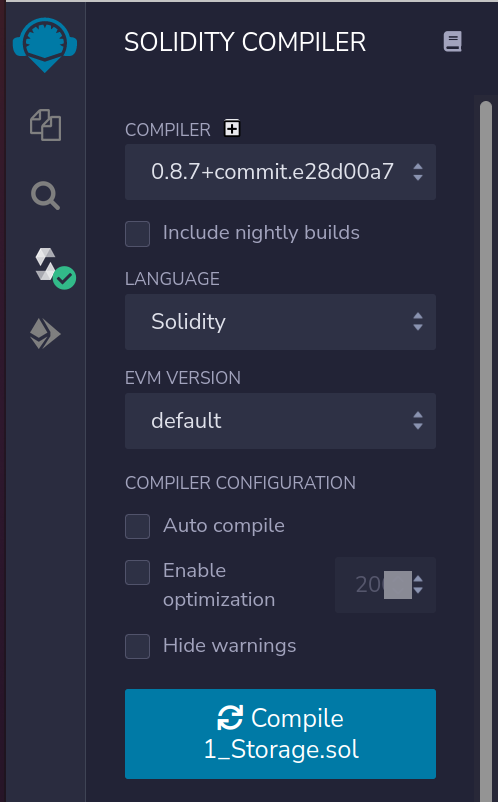
Below the Solidity icon is a fourth icon that includes the Ethereum logo. Clicking this opens the Deploy menu. In this menu, Remix can be configured to connect to the local Parallax client. In the drop-down menu labelled
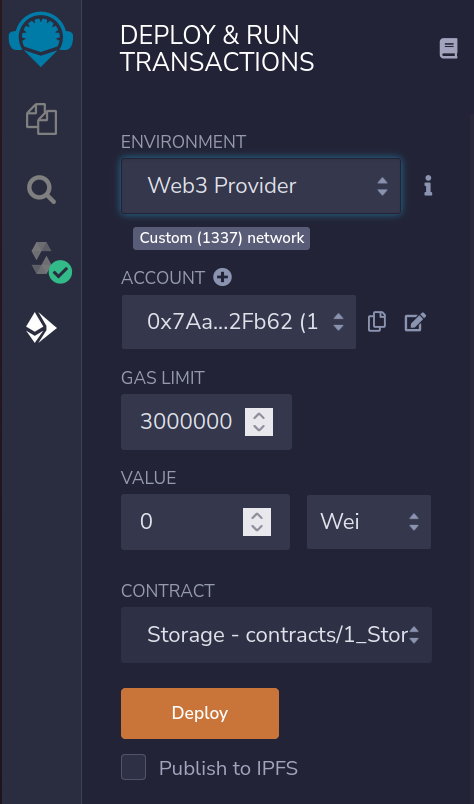
 ENVIRONMENT, select Injected Web3. This will open an information pop-up with instructions for configuring the Parallax client - these can be ignored as they were completed earlier in this tutorial. However, at the bottom of this pop-up is a box labelled Web3 Provider Endpoint. This should be set to Parallax client’s 8545 port on localhost (127.0.0.1:8545). Click OK. The ACCOUNT field should automatically populate with the address of the account created earlier using the Parallax client Javascript console. To deploy Storage.sol, click DEPLOY. The following logs in the Parallax client terminal confirm that the contract was successfully deployed.
INFO [05-09|12:27:09.680] Setting new local account                address=0x7Aa16266Ba3d309e3cb278B452b1A6307E52Fb62
INFO [05-09|12:27:09.680] Submitted contract creation              hash=0xbf2d2d1c393a882ffb6c90e6d1713906fd799651ae683237223b897d4781c4f2 from=0x7Aa16266Ba3d309e3cb278B452b1A6307E52Fb62 nonce=1 contract=0x4aA11DdfD817dD70e9FF2A2bf9c0306e8EC450d3 value=0
INFO [05-09|12:27:09.681] Commit new sealing work                  number=2 sealhash=845a53..f22818 uncles=0 txs=1 gas=125,677 fees=0.0003141925 elapsed="335.991µs"
INFO [05-09|12:27:09.681] Successfully sealed new block            number=2 sealhash=845a53..f22818 hash=e927bc..f2c8ed elapsed="703.415µs"
INFO [05-09|12:27:09.681] 🔨 mined potential block                  number=2 hash=e927bc..f2c8ed

Interact with contract using Remix

The contract is now deployed on a local testnet version of the Parallax blockchain. This means there is a contract address that contains executable bytecode that can be invoked by sending transactions with instructions, also in bytecode, to that address. Again, this can all be achieved by constructing transactions directly in the Parallax client console or even by making external http requests using tools such as Curl. Here, Remix is used to retrieve the value, then the same action is taken using the Javascript console. After deploying the contract in Remix, the Deployed Contracts tab in the sidebar automatically populates with the public functions exposed by Storage.sol. To send a value to the contract storage, type a number in the field adjacent to the store button, then click the button. 
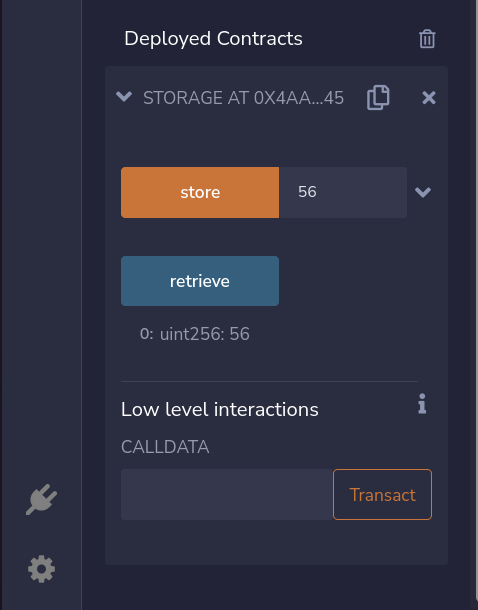
In the Parallax client terminal, the following logs confirm that the transaction was successful (the actual values will vary from the example below):
INFO [05-09|13:41:58.644] Submitted transaction                    hash=0xfa3cd8df6841c5d3706d3bacfb881d2b985d0b55bdba440f1fdafa4ed5b5cc31 from=0x7Aa16266Ba3d309e3cb278B452b1A6307E52Fb62 nonce=2 recipient=0x4aA11DdfD817dD70e9FF2A2bf9c0306e8EC450d3 value=0
INFO [05-09|13:41:58.644] Commit new sealing work                  number=3 sealhash=5442e3..f49739 uncles=0 txs=1 gas=43724   fees=0.00010931   elapsed="334.446µs"
INFO [05-09|13:41:58.645] Successfully sealed new block            number=3 sealhash=5442e3..f49739 hash=c076c8..eeee77 elapsed="581.374µs"
INFO [05-09|13:41:58.645] 🔨 mined potential block                  number=3 hash=c076c8..eeee77
The transaction hash can be used to retrieve the transaction details using the Parallax client Javascript console, which will return the following information:
{
  accessList: [],
  blockHash: "0xc076c88200618f4cbbfb4fe7c3eb8d93566724755acc6c4e9a355cc090eeee77",
  blockNumber: 3,
  chainId: "0x539",
  from: "0x7aa16266ba3d309e3cb278b452b1a6307e52fb62",
  gas: 43724,
  gasPrice: 3172359839,
  hash: "0xfa3cd8df6841c5d3706d3bacfb881d2b985d0b55bdba440f1fdafa4ed5b5cc31",
  input: "0x6057361d0000000000000000000000000000000000000000000000000000000000000038",
  maxFeePerGas: 4032048134,
  maxPriorityFeePerGas: 2500000000,
  nonce: 2,
  r: "0x859b88062715c5d66b9a188886ad51b68a1e4938d5932ce2dac874c104d2b26",
  s: "0x61ef6bc454d5e6a76c414f133aeb6321197a61e263a3e270a16bd4a65d94da55",
  to: "0x4aa11ddfd817dd70e9ff2a2bf9c0306e8ec450d3",
  transactionIndex: 0,
  type: "0x2",
  v: "0x1",
  value: 0
}
The from address is the account that sent the transaction, the to address is the deployment address of the contract. The value entered into Remix is now in storage at that contract address. This can be retrieved using Remix by calling the retrieve function - to do this simply click the retrieve button. Alternatively, it can be retrieved using web3.getStorageAt using the Parallax client Javascript console. The following command returns the value in the contract storage (replace the given address with the correct one displayed in the Parallax client logs).
web3.eth.getStorageAt("0x407d73d8a49eeb85d32cf465507dd71d507100c1", 0)
This returns a value that looks like the following:
"0x000000000000000000000000000000000000000000000000000000000000000038"
The returned value is a left-padded hexadecimal value. For example, the return value 0x000000000000000000000000000000000000000000000000000000000000000038 corresponds to a value of 56 entered as a uint256 to Remix. After converting from hexadecimal string to decimal number the returned value should be equal to that provided to Remix in the previous step.

Reusing —datadir

This tutorial used an ephemeral blockchain that is completely destroyed and started afresh during each dev-mode session. However, it is also possible to create persistent blockchain and account data that can be reused across multiple sessions. This is done by providing the --datadir flag and a directory name when starting the Parallax client in dev-mode.
prlx --datadir dev-chain --dev --http --http.api web3,eth,net --http.corsdomain "remix.ethereum.org"

Re-using accounts

The Parallax client will fail to start in dev-mode if keys have been manually created or imported into the keystore in the --datadir directory. This is because the account cannot be automatically unlocked. To resolve this issue, the password defined when the account was created can be saved to a text file and its path passed to the --password flag on starting the client, for example if password.txt is saved in the top-level parallax directory:
prlx --datadir dev-chain --dev --http --http.api web3,eth,net --http.corsdomain "remix.ethereum.org" --password password.txt
Note that this is an edge-case that applies when both the --datadir and --dev flags are used and a key has been manually created or imported into the keystore.

Summary

This tutorial has demonstrated how to spin up a local developer network using the Parallax client. Having started this development network, a simple contract was deployed to the developer network. Then, Remix was connected to the local Parallax client and used to deploy and interact with a contract. Remix was used to add a value to the contract storage and then the value was retrieved using Remix and also using the lower level commands in the Javascript console.
I